To conquer The Unmaking Extreme trial in Final Fantasy XIV, focus on mastering Naught Grows mechanics, managing the adds phase efficiently, understanding Voidal Turbulence, and employing precise light party positioning throughout the encounter.
Preparing for The Unmaking Extreme
Before starting The Unmaking Extreme trial, ensure your party is well-prepared with the following setups:
prerequisites
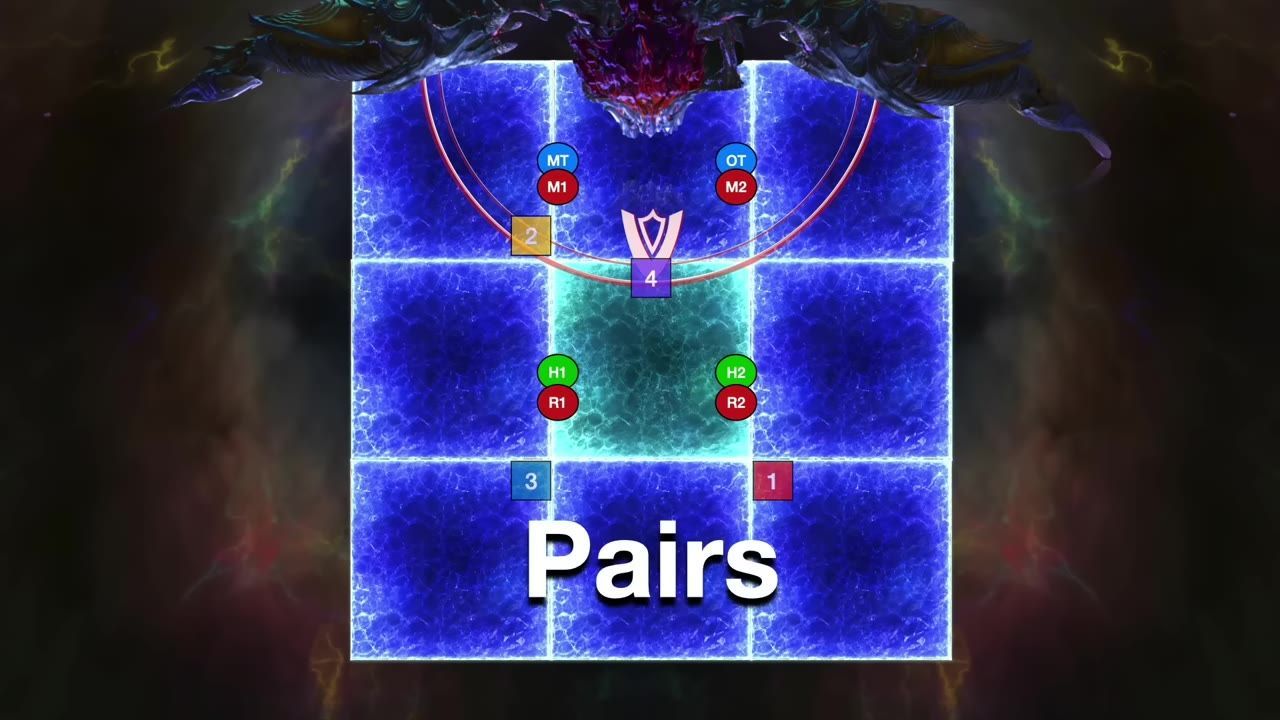
- Assign clock positions and pair positions for mechanics.
- Use light party designations: divide the group into west and east subgroups as instructed during specific mechanics.
- Mark healers with noticeable markers for easier tracking during chaotic moments.
- Set orb priorities relative to tanks, followed by healers, melee DPS, and ranged DPS.
- Determine adds priority, focusing on pair positions and a north-south orientation.

The arena setup with clock positions and markers for 'The Unmaking Extreme'. — Hector Hectorson - Hector Lectures
Naught Grows Mechanic
steps
- Observe the number of orbs spawning on one or both healers.
- If there is one orb, the party stacks as a full group.
- If there are smaller orbs, organize into light party stacks.
- Respond to the AoEs from the boss and the black hole:
- A point-blank AoE requires players to retreat towards the wall.
- A donut-shaped AoE from the black hole requires proximity to the black hole.
- Position tanks to soak damage from the line stacks with proper mitigation. Healers must avoid being clipped by both line stacks—staying within the inner hitbox often helps.

Diagram indicating orb spawning positions and character roles in the Knot Grows mechanic. — Hector Hectorson - Hector Lectures
Adds Phase Strategy
steps
- Note the eight potential tower spawn locations, split across the arena along a north-south axis (two towers west, two towers east).
- Assign northern players to handle north towers on their side and southern players to handle south towers.
- Players will soak towers for their roles (support or DPS). Tower positions follow a pattern based on light party or pair positioning.
- Soaked towers spawn an add tethered to the soaking player. Each role has a specific add:
- Tanks: Protecting Shadow — interrupt its Drain Touch skill and mitigate line-target tank busters.
- Healers: Soothing Shadow — manage debuffs with Esuna.
- DPS: Aggressive Shadow — avoid its Demon Eye gaze by looking towards the center.
- Coordinate add handling within the light parties to focus damage effectively.

A strategy diagram depicting tower positions and priority party placements in an Adds Phase. — Hector Hectorson - Hector Lectures
Managing Meltdown Mechanic
steps
- During the pyretic-style debuff, avoid moving for its duration or suffer damage.
- Once the debuff expires, immediately relocate to your clock spot while staying within maximum melee range.
- Ensure players spread out to avoid twisters and subsequent AoEs which target their positions.

A diagram of player positions and statuses during the Meltdown mechanic in a raid. — Hector Hectorson - Hector Lectures
Voidal Turbulence Explanations
steps
- Four towers will appear, and four players will be marked with AoEs. Assign supports to the tower soaking and DPS to start positioning for marker avoidance.
- Tether mechanics:
- Yellow tethers pull faster than blue/purple ones. Pop pairs of yellow first, rotating clockwise or counterclockwise to reach the next tether priority.
- Tanks should take large orbs first, followed by healers, melee DPS, and ranged DPS to pop assigned tethers without overlapping.
- Manage debuffs and allow safe time between pops to avoid knockback or excess damage.

The arena layout is displayed with visible towers and AOE markers. — Hector Hectorson - Hector Lectures
Light Party Positions and Safe Zones
steps
- Position light parties at west and east or split groups relative to mechanics such as Naught Grows.
- Pre-position to avoid unsafe zones during Voidal Turbulence and Meltdown.
- Ensure tight stacks in moments of high damage to assist healing and mitigation.

The arena demonstrates light party positions with clear marked zones for players. — Hector Hectorson - Hector Lectures
FAQ
What are the mechanics of The Unmaking Extreme?
Mechanics include Naught Grows, Meltdown, Voidal Turbulence, black hole splits, and adds phase towers and tethers—each requires precise positioning and mitigation.
How to handle Naught Grows in The Unmaking Extreme?
Naught Grows involves orb stacks (light or full party), proximity AoEs from the boss and black hole, and tanks positioning closest to mitigate damage from wild charges.
What is the strategy for the adds phase in The Unmaking Extreme?
Assign players to soak towers based on light parties and pair positions, defeat tethered role-specific adds, and manage mechanics such as gaze attacks and debuff cleanses.
How do the towers mechanics work in The Unmaking Extreme?
Towers spawn in predictable patterns divided east and west relative to the arena center. Supports and DPS alternate soaking responsibility, each spawning adds that must be defeated promptly.
What positioning is needed for The Unmaking Extreme mechanics?
Players must follow clock spots, light party setups, and pair positions. Orbs and AoEs require proximity or distance adjustments, while certain mechanics depend on fixed role assignments for proper handling.
Sources
Screenshots on this page are frames from the videos below, used to illustrate the steps they describe. All rights remain with their creators.
- The Unmaking Extreme Guide — Hector Hectorson - Hector Lectures, April 30, 2026
Checked against:
- Patch 7.55 Notes — SquareEnix Vystenya, 2026-07-28
- Patch 7.51 Notes — SquareEnix Vystenya, 2026-06-02
- Patch 7.5 is live! — SquareEnix Vystenya, 2026-04-28
- Topics | FINAL FANTASY XIV, The Lodestone — FINAL FANTASY XIV, The Lodestone